Wrestling with Wraith: Quick and Dirty Visual Regression Testing
Wrestling with Wraith: Quick and Dirty Visual Regression Testing
Mike Crittenden | Senior Software Architect
September 3, 2015
Phase2 has a great set of posts on visual regression testing already, but one thing that we haven't covered yet is Wraith, a super cool screenshot comparison tool built by BBC.
Why is Wraith super cool?
First of all, visual regression testing in general is extremely useful. For those who may be unfamiliar, the main purpose of these tools is to compare the same page (or sections of the same page) on separate environments to highlight any differences, thereby discovering when a bug has popped up. Often, it's the type of bug that may be very difficult to notice by just browsing the site: "That headline is in all caps in sandbox but title case on prod? Bug!" Then we have Wraith. Two things make Wraith a great tool to work with: the low barrier to entry and the fantastic gallery it generates for you.
Ease of use
The first benefit of Wraith is how extremely easy it is to set up. Once you have the dependencies downloaded, you can go from zero to having a fully built visual regression test config and running it in less than 10 minutes. This is possible because Wraith captures full pages, whereas some other tools (such as PhantomCSS) test sections of pages. This makes some things a bit tricky, such as dynamic content which can change per-environment (I'll come back to this), but it definitely speeds up the initial setup by a huge amount. All you have to do is input some URLs and a couple domains to compare, as opposed to defining granular elements on pages all over the place. In essence, this is a great real-world example of the 80/20 rule (aka the Pareto Principle). In a very short amount of time (somewhere around 20% of the time it would take to get a rockin' PhantomCSS setup going) you still get a lot of value (somewhere around 80% of the value that a rockin' PhantomCSS setup could provide). In a bit, I'll show you what the config looks like so you can see for yourself.
The gallery
Not only does Wraith take screenshots and generate diffs of different environments, it also lays everything out on an awesome gallery page. The gallery it creates is just a simple HTML file that you can open in a browser, and it shows thumbnails of each screenshot alongside the diffs. Here's a quick example:
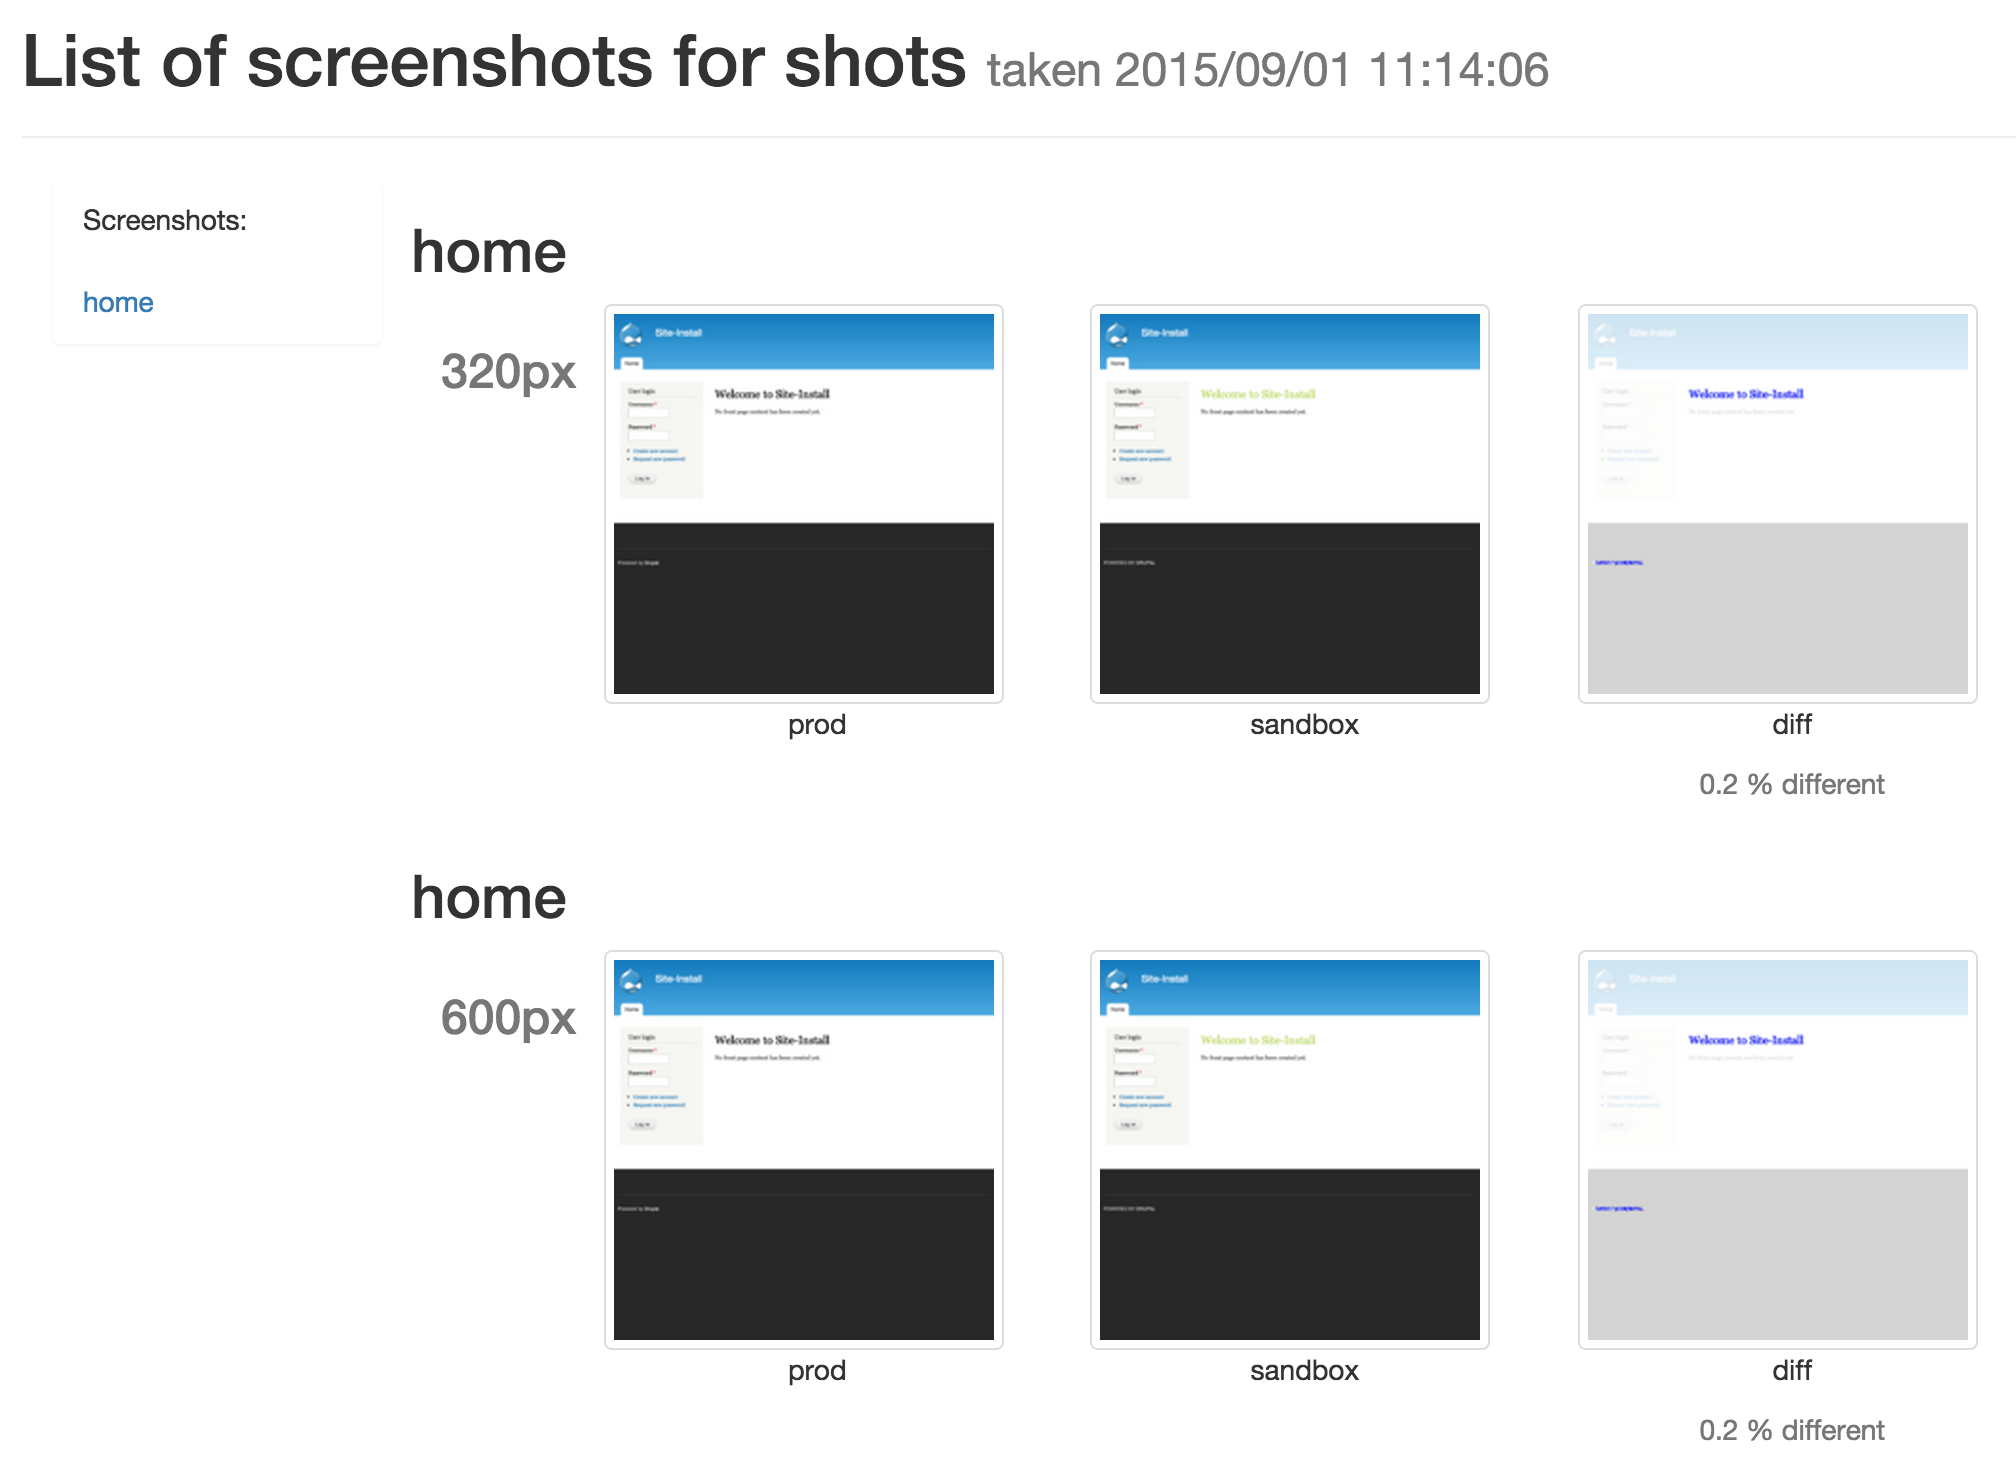
Look at that! Our headline color changed, and our footer is all caps! Bugs! The gallery is smart in that it lets you filter out items that aren't different enough to warrant being displayed (using the "threshold" setting), and it lets you sort in order of most different pages to least different pages if you want to display the ones that have the most drastic changes first.
Installation
Installation depends on the OS, but basically you just need these 3 things installed:
- PhantomJS (or SlimerJS)
- ImageMagick
- Ruby
Once those are installed on your system, you can go ahead and install Wraith, which is packaged as a Ruby gem.
gem install wraithOnce installed, you should see the following when you run the "wraith" command:
Commands:
  wraith capture [config_name]              # A full Wraith job
  wraith compare_images [config_name]       # compares images to generate diffs
  wraith crop_images [config_name]          # crops images to the same height
  wraith generate_gallery [config_name]     # create page for viewing images
  wraith generate_thumbnails [config_name]  # create thumbnails for gallery
  wraith help [COMMAND]                     # Describe available commands or one speci...
  wraith history [config_name]              # Setup a baseline set of shots
  wraith latest [config_name]               # Capture new shots to compare with baseline
  wraith multi_capture [filelist]           # A Batch of Wraith Jobs
  wraith reset_shots [config_name]          # removes all the files in the shots folder
  wraith save_images [config_name]          # captures screenshots
  wraith setup                              # creates config folder and default config
  wraith setup_casper                       # creates config folder and default config...
  wraith setup_folders [config_name]        # create folders for images
You first Wraith config
Now that you have Wraith installed, you can start using it. Let's kick things off:
wraith setupThat should give you the following output:
create configs/config.yaml create javascript/snap.jsAs you can see, it created those two files for you. The YAML file is where your config is going to live, and the JS file is where you can do some more advanced stuff as screenshots are being taken (more on that in a bit). Let's take a look at the default YAML file:
#Headless browser option
browser:
  phantomjs: "phantomjs"
  # slimerjs: "slimerjs"
#If you want to have multiple snapping files, set the file name here
snap_file: "javascript/snap.js"
# Type the name of the directory that shots will be stored in
directory: 'shots'
# Add only 2 domains, key will act as a label
domains:
  english: "http://www.live.bbc.co.uk/news"
  russian: "http://www.live.bbc.co.uk/russian"
#Type screen widths below, here are a couple of examples
screen_widths:
  - 320
  - 600
  - 768
  - 1024
  - 1280
#Type page URL paths below, here are a couple of examples
paths:
  home: /
  uk_index: /uk
#Amount of fuzz ImageMagick will use
fuzz: '20%'
#Set the number of days to keep the site spider file
spider_days:
  - 10
#Choose how results are displayed, by default alphanumeric. Different screen widths are always grouped.
#alphanumeric - all paths (with, and without, a difference) are shown, sorted by path
#diffs_first - all paths (with, and without, a difference) are shown, sorted by difference size (largest first)
#diffs_only - only paths with a difference are shown, sorted by difference size (largest first)
mode: diffs_first
threshold: 5
It's all pretty understandable without much explanation, but just so we're clear, let's go item by item and talk about what each one means.
#Headless brow#Headless browser option
browser:
  phantomjs: "phantomjs"
  # slimerjs: "slimerjs"
Most people will be using PhantomJS and can leave this one alone. SlimerJS is more or less the same thing as PhantomJS, except that it's built on top of Gecko (the engine behind Firefox) instead of Webkit.
#If you want to have multiple snapping files, set the file name here
snap_file: "javascript/snap.js"
If you want to rename the JS file used by this config to something else then you can do that here. For example, you may have multiple configs for different sites in the same directory, each of which need a separate JS file. In a recent project of mine, I was running Wraith against a platform of about 22 sites (each of which had prod and sandbox instances), all needing their own config and a few needing separate JS files to site-specific stuff. This setting makes that possible.
# Type the name of the directory that shots will be stored in
directory: 'shots'
The directory entered here will be the one that is used to store the images that Wraith captures along with the gallery HTML file and the thumbnails for the gallery. This is another setting that comes in handy when you want to test multiple sites in the same directory. This way, you can give each config/site its own directory to dump the results in.
# Add only 2 domains, key will act as a label
domains:
  english: "http://www.live.bbc.co.uk/news"
  russian: "http://www.live.bbc.co.uk/russian"
Now we're getting to the good stuff. This is where you can enter the two domains you want to compare. Typically, this will be something like "prod" and "sandbox", or "staging" and "integration." In other words, you usually have one "trustworthy" environment to use as the source of truth and one "less trustworthy" environment to compare with. Note that you don't need pretty URLs to use this. You can easily use "http://127.0.0.1:8888" as a domain, if needed.
#Type screen widths below, here are a couple of examples
screen_widths:
  - 320
  - 600
  - 768
  - 1024
  - 1280
This gives you the ability to test responsive sites. If all you care about is how things look on a 1024px browser (really?) then you can remove all of the lines but that one. But assuming you care how your site looks anywhere from tiny mobile resolutions to huge desktop resolutions, here you go. The end result is the generation of an image per screen width, per page, per domain, so that you can see the full picture.
#Type page #Type page URL paths below, here are a couple of examples
paths:
  home: /
  uk_index: /uk
The specific pages you want to test go here. There's no limit to how many you list. Just keep in mind that the pages you list need to exist on both environments that you're testing, and the more you list, the longer the tests will take to run. I also sometimes find that it's useful to add "?wraith" to the ends of each path, so that you can see which requests are coming from Wraith in logs/analytics if needed. This can also be useful for busting caches to make sure you're testing fresh pages, not cached ones.
#Amount of fuzz ImageMagick will use
fuzz: '20%'
The docs for this one say "Use this option to match colors that are close to the target color in RGB space, this number helps with anti-aliasing." I recommend just leaving it alone unless you know what you're doing.
#Set the number of days to keep the site spider file
spider_days:
  - 10
Wraith supports spidering your sites. In other words, if you don't want to manually enter URLs, you can use the spidering functionality to have it auto-follow links in pages. You can even exclude paths and use regex. The option above just tells Wraith how long it should keep the generated file of URLs around before it needs to generate a new one.
#Choose how results are displayed, by default alphanumeric. Different screen widths are always grouped.
#alphanumeric - all paths (with, and without, a difference) are shown, sorted by path
#diffs_first - all paths (with, and without, a difference) are shown, sorted by difference size (largest first)
#diffs_only - only paths with a difference are shown, sorted by difference size (largest first)
mode: diffs_first
By default, when viewing the gallery, results are listed in alphabetical order. This option lets you change that, so that you can sort by the amount of differences, or even exclude paths that don't have any differences from being displayed at all.
threshold: 5Finally, we have the threshold option. This lets you control what percentage of difference is required for a page to be considered "an error." If a percentage above this amount is found when comparing a specific page, then that page is considered an error and is displayed with red text when viewing the gallery. Using the above "mode" option, you can make these pages display first, or make ONLY these pages display, if desired. And there we have it. That's the Wraith config from start to finish.
Run it!
Once you've added your domains and paths, you're ready to run a test. This part couldn't be easier:
wraith capture configs/config.yamlThat should give you some output that looks something like this:
Creating Folders
Snapping http://127.0.0.1:8888/ at width 600
Snapping http://127.0.0.1:8888/ at width 320
Snapping http://127.0.0.1:8888/ at width 1024
Snapping http://127.0.0.1:8888/ at width 768
Snapping http://127.0.0.1:8889/ at width 320
Snapping http://127.0.0.1:8889/ at width 600
Snapping http://127.0.0.1:8889/ at width 768
Snapping http://127.0.0.1:8889/ at width 1024
Snapping http://127.0.0.1:8888/ at width 1280
Snapping http://127.0.0.1:8889/ at width 1280
cropping images
cropping images
cropping images
cropping images
cropping images
Saved diff
Saved diff
Saved diff
Saved diff
Saved diff
Generating thumbnails
Gallery generated
Once complete, you'll have a new "shots" directory (unless you changed the name of that directory to something else in the config.yaml file). This file contains a gallery.html file. Go ahead and open that up in a browser to see your fancy new gallery!
Automate it!
That's all well and good, but who wants to sit there and run this manually all the time? Let's make it run nightly and dump the gallery into a place that the whole team can access. For this part, you'll obviously need to have some method of running commands nightly - Jenkins, crontab, whatever. Also, assuming we're talking about the kind of site that gets out of sync, meaning that new content is created often on production which needs to be synced back to sandbox or staging periodically, I recommend setting it up so that Wraith runs immediately after this DB sync happens. This way, you minimize the risk of false positives due to out of sync data. With all of that out of the way, you just need to schedule the running of a set of commands that will run Wraith and copy the directory it generates into a directory that is available on the web to your team. For example, let's say that you're working on http://yoursite.com. You could create a http://wraith.yoursite.com subdomain which points to /var/www/wraith, and then run this nightly:
# Go to wherever your configs exist
cd /path/to/your/configs
# Run Wraith and ignore any error code it may return
wraith capture configs/config.yaml || true
# Move the results onto the test site
rm -rf /var/www/wraith/*
mv /shots/* /var/www/wraith
Pretty simple. The only gotcha is the "|| true" part. If Wraith spots any errors, meaning it finds a path that has a differences percentage that is above the threshold you set, then it will return an error code. If you're using Jenkins, then that error code would kill your build. So we just need to ignore it. Run that little chunk of code every night, and every morning when you start work, you'll have a fresh visual regression test of the previous day's worth of work to check out.
Dealing with dynamic elements
We haven't talked about the fancy "snap.js" file yet. This file lets you hook into the process of loading pages and taking screenshots of them, and run custom code along the way, or change config on the fly. Let's talk through an example. Does your site have something that is dynamic, and can't be trusted to be the same on both environments? For example, make you're running ads, and who knows what the ad server is going to give you on any given page load. With snap.js, we can add custom CSS or run custom JS on the page before the screenshot is generated. This means that we can do any of the following:
- Hide dynamic content
- Replace dynamic content with a big gray box with a set width and height for consistency
- Replace dynamic content with a note that says "DYNAMIC CONTENT REMOVED FOR TESTING"
- Alter dynamic content in some way to ensure consistency (for example, if you're displaying a randomly sorted list of something, then sort it alphabetically via JS).
Here's an example of the easiest one, just hiding the dynamic content. First, find this little snippet in snap.js:
page.open(url, function(status) {
  if (status !== 'success') {
    console.log('Error with page ' + url);
    phantom.exit();
  }
});
This is your chance. You can add a few lines in here that will do whatever you want. Here, let's hide our ads:
page.open(url, function(status) {
  if (status !== 'success') {
    console.log('Error with page ' + url);
    phantom.exit();
  }
  page.evaluate(function() {
    var styles = document.createElement("style");
    var head = document.getElementsByTagName("head")[0];
    styles.innerHTML = '.ad { display: none !important; }';
    head.appendChild(styles);
  });
});
See that? We just added a line of CSS, and poof, our ads are hidden, and our visual regression tests are reliable again. Yay!
Targeting Selectors
At the risk of violating the main point of this post (which is that Wraith can give you a lot of value for very little effort, i.e., the 80/20 rule), it is worth mentioning that it does support capturing and comparing individual regions of pages using selectors. For this, the setup is a bit different. For starters, you'll need to have CasperJS installed. Next, instead of "wraith setup" to generate the starter config, you'll need to run:
wraith setup_casperThat will give you these files:
create  configs/component.yaml
create  javascript/casper.js
Now, you can edit the component.yaml file and you'll see that instead of just listing paths, you're listing selectors, each of which has a path.
paths:
  brand:
    path: /
    selector: '.site-brand'
That will grab the ".site-brand" region of the "/" page, as opposed to the whole page, and compare that. Still super easy to set up, but gives you a lot of power. And that's it, folks! From zero to visual regression testing just like that. It's so easy to set up that there's almost no reason not to do it!