Using Jmeter to Test Performance and Scalability
Using Jmeter to Test Performance and Scalability
Phase2 | Digital Agency
September 4, 2013
Jmeter is a tool for testing performance and scalability. It replicates the act of many users hitting a system and it tracks statistics about the activity. It can replicate a user logging into your site and submitting forms. However, editing an existing node in a jmeter test is unfortunately complicated (unless you don’t mind losing the current values of some of the fields!) While Jmeter does replicate a browser, it does not submit the form. It takes what data it’s told to submit and sends a request to the server with that data, so any data that should not be changed needs to be fetched and submitted along with the current value. So to preserve the data of a node:
- Add an HTTP request for the page with the form, e.g. /node/{nid}/edit
- Use a regular expression post processor to parse the current values of relavent fields.
- Send a post request to the page with those values
But first things first, you need a test suite:
Getting started:
First, you need to install jmeter and start up the GUI. For mac, I downloaded it, cd-ed to the directory and ran sh ./apache-jmeter-2.9/bin/jmeter.sh. While it's possible to run sans GUI, creating the test would be quite annoying unless you really really like editing XML files manually. Next, you need a test. I chose to start using Jacob Signh's example testing suite. Update the values for the drupal 7 configuration to your own site’s information. Jacob Singh's tests includes both tests for anonymous and authenticated browsing. The authenticated browsing test has a hard coded username/password to login with, so change those to a user on your system. Take a glance to see what each of these test plans do. Jmeter will run each plan for however many loops are specified in the configuration (click around and run the tests!). After a few failed runs, I realized my tests had a small bug -- the “only once controller” is not needed for any of the tests. They currently login the user then log them out of the first run, but never log them back in the second time because both operations are done only once for all loops. You can either remove the log out sampler from the "only once controller" or both login and logout. Leaving the login sampler in only once means the user will only be logged in the first run. (Move the login/logout sampler out of it and remove those controllers. To remove the login/logout from the samplers you can drag the sampler to the action item that it should happen before, then dropping it, and selecting “Insert Before,” option, and then right click and “Remove” the only once controller. (A sampler is something that a user does). While you may hard code the user login credentials, I decided instead to change login credentials to variables.

Then I use a CSV Data Set Config to read a file of username/passwords so that it loops through several user accounts instead of logging that single user in.

I created those accounts using drush generate-users (from the devel submodule devel generate) with the password option.
sudo drush generate-users --pass=password123;Then, to get a list of users, I ran:
drush sqlq "select concat(name, ',', ‘password123’) from users order by uid desc limit 200 "My test site is behind a VPN, so secure and obscure passwords were not needed. Make sure whatever users you select have permission to access what you want them to use. That command, "drush generate-users," has a role option that can be used to set what roles the generated users have. Now that you have user/s to test with, you need a test plan. You could modify the current authenticated test, duplicate it (right click, duplicate), or create a new one, whichever fits your needs. I went the duplicate route.
How to add an HTTP request for the page with a form:
I decided to also use the CSV Data Set the configuration to parse a file of urls to visit a node so that it would test a variety of nodes instead of a hard coded single space (which changes my test from testing a single page to testing the load on a site with similar operations going on.) Since I wanted to view and edit, I made a list of view urls and used jmeter to look up the NID and create the edit url. Even if you decide to hard code the edit url, don't skip this section; the technique used here is used later for submitting the edit form. Next, add an HTTP request sampler to the thread (e.g. the authenticated test), and use the view url of the page you want to edit it after the user has logged in but before they are logged out.
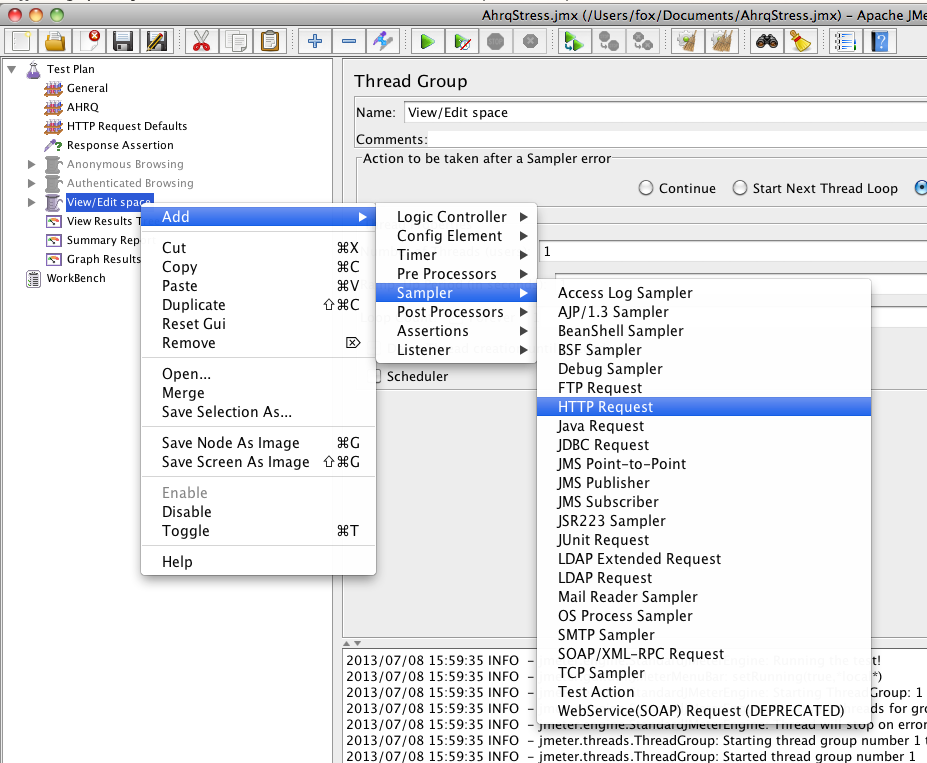
This will fetch that page for the current user, which can then be parsed to extract information from the HTML. Instead of trying to parse for the edit link, which is in a poorly labeled unordered list of links, I figured I would find the NID somewhere else in the page, and thanks to drupal's themeing layer love for adding any class that may be useful, the NID tends to sneak its way into various parts of the HTML source. For example, I viewed the source and found it both in an nid of the page, in a body class page-node-{nid}, and in the edit link itself node/{nid}/edit. I decided to the class page-node-{nid} was most distinct (as the path node/X/edit could also be a view edit links to other nodes). Right click on the HTTP request sample and add a regular expression extractor post processor as a child of the HTTP request.
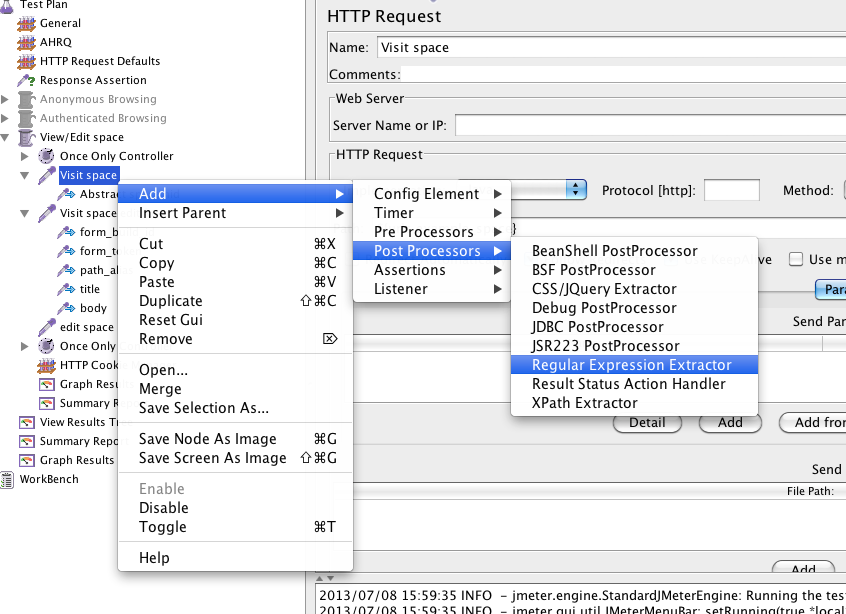
The regular expression extractor allows you to input a regular expression that can be run against the returned HTML source of the HTML request.
- Name it something distinct so you know what it’s doing.
- Set the Reference Name to a unique variable where NID will be stored. I chose SPACE_NID andI named my content type “space”.
- Set Regular Expression to page-node-([1-9][0-9]*) This will look for a string that begins with page-node-, followed by at least one single digit between 1 and 9, and then any amount of additional digits. The () will indicate that part of the expression will be stored as a sub match.
- Set Template to $1$. This says to grab the first sub match, for us , this is the pattern in ([1-9][0-9]*).
- Set Match No. to 1 to use the first matched string (though there should only be one page-node-{nid} on the page, hopefully!)

Now I can visit the edit url via /node/{SPACE_NID}/edit. Again, I could have hard coded this step, but this technique of using regular expression is needed for the next step.
How to use a regular expression post processor to abstract the values you want to preserve:
Now, add a new HTTP request, but for the edit page, e.g. /node/{SPACE_NID}/edit (whether you need the first slash depends on how you configure the host in earlier steps). This request will be used to abstract the form values For most Drupal forms outside of anonymous forms like user login, you will need to submit with a form_build_id and form_token for the form to submit successful. These tokens are used for security and to enable operations like ajax replacements (where parts of the form are changed) to not confuse two incidents of the same form. Like above, add a regular expression extractor to your edit form HTTP request. For form_build_id:
- Reference Name: form_build_id
- Regular Expression: name="form_build_id" value="(form-.*)"
- Template: $1$
- Match: 1
This will find the element with form_build_id as name and grabs what is in value attribute For form_token
- Reference Name: form_token
- Regular Expression: name="form_token" value="(.*)"
- Template: $1$
- Match: 1
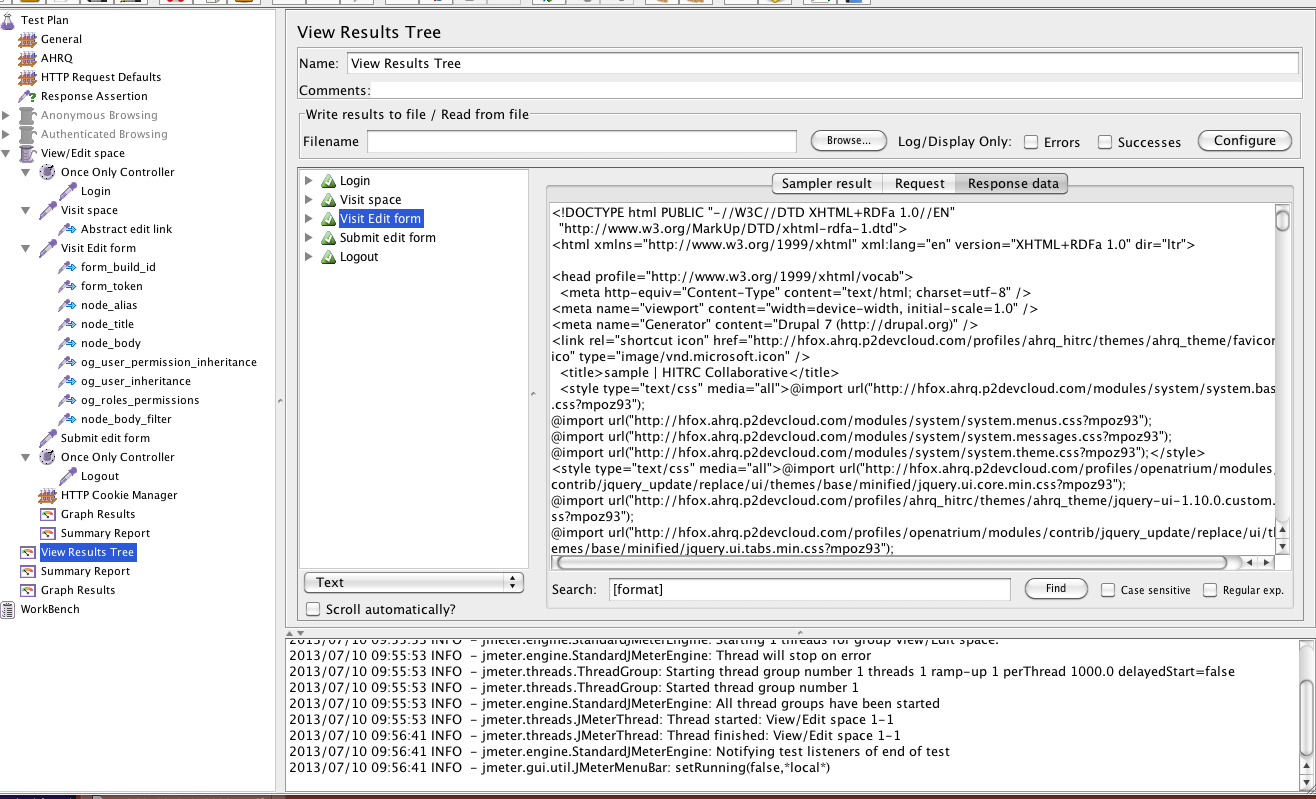
For the node form that I wanted to edit, some of the correct Regular Expression elements were trickier to figure out than others. I used a regular expression tester (don’t google preg tester when looking for a regular expression tester). Regular expressions test sites are like chocolate, some people have their favorite tool, some make their own, others just use the first result on google like me. At first, I used firefox’s developer tools to inspect the input element and copy the outer HTML and then used that to test against it. However, I found out the hard way that firefox makes your HTML more readable by re-arranging it so while the regrex matched what firefox’s dom inspector, it failed to match the actual source code (e.g. source code is "<input value ="value" class="class" but firefox dom inspector displays "<input class="class" value="value"). Instead, I used jmeter, pressed the green Play button to start off my test (after 1) restricting the test to one user and one loop, 2) Right clicked the other tests and clicked “disable” so only the part I absolutely needed to run, ran). From there, I looked at the result tree for the next step I wanted (to visit the edit page), and copy the HTML source from the “Reponse Data” tab.
Some regrex’s I used:
- node title: id="edit-title"[^>]*value="([^"]*)"
- path alias: id="edit-path-alias"[^>]*value="([^"]*)"
- body/textarea field: id="edit-body[A-Za-z0-9"- =][]*>([^<]*)</textarea
- Radio boxes: id="id-of-field-[^>]*value="([^"]*)"[^>]*checked="checked"
- Single select field: name="name_of_field((?!/select).)*value="([^"]*)"[^<]*selected="selected" (set Template set to $2$)
Now that I have the values I want to use, I can submit the form.
How to submit a post request with the values:
Since the regular expression is a post processor, it needs to come after the request, so I cant reuse the same request to submit the values. In this case you can add a second HTTP request for the same page.
Change Method to Post so it submits as a POST instead of GET.
Next, add your parameters. To find what parameters I wanted, I opened my browser’s network tab and submitted the edit form then looked at what values were posted. Some browsers clear the network tab after a successful form submission and redirect. To get around that I caused a validation error -- I blanked out the title so it's cause a title field is required validation error.
To add the parameters to the request:
- Click add under “Parameters”
- Under name column, set the ‘name’ of the input element (e.g. name=”form_build_id”)
- Under value use ${variable_name}, where variable_name is the reference name for this data from above, (e.g. ${form_build_id}).
Do this for every parameter you want to preserve.
For those you want to change, enter the value you want. For example if you want to change title to dog, set it to “dog”. If you want to add one to existing title, use “${title} 1."
Press play and check to see if the node was changed as desired and that your regular expression has successfully extracted their values. After pressing play, examine the result tree again. My initial posts had validation errors so the main request was one with the POST request.
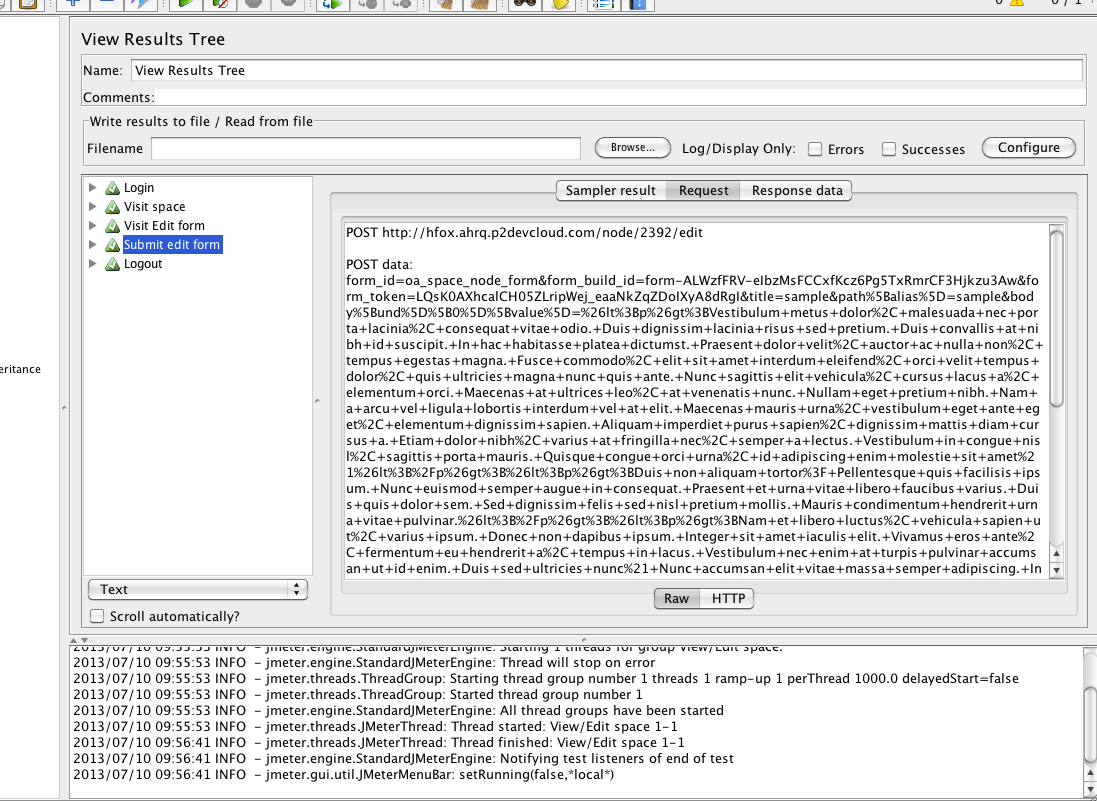
As soon as it successfully posted, I needed to expand the item and find the intial edit request to see the request data. (the other requests were css/js files and the final node view).
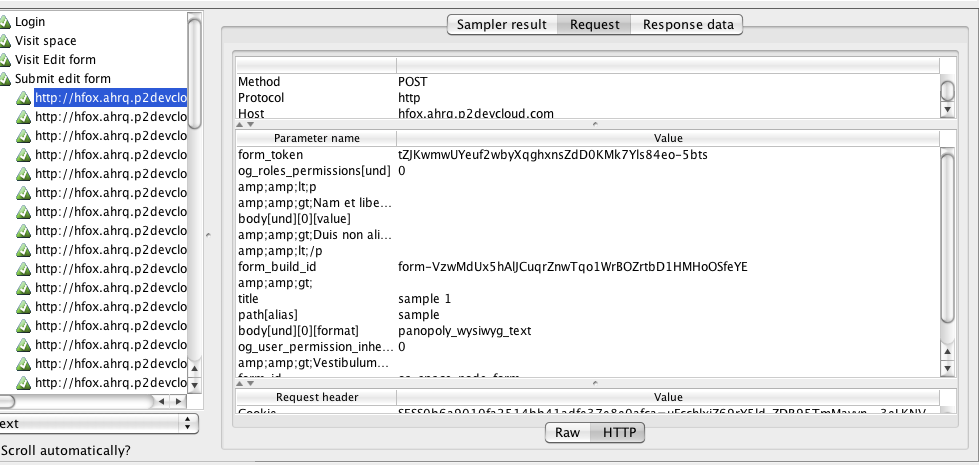
I set all my defaults for the regular expression to NO_DEFAULT so I could look for “NO_DEFAULT” in the response data (as anywhere NO_DEFAULT appears because the regrex failed to match. I knew these values were in the form so it would not fallback to default). I viewed the raw request which looks like a GET request with query parameters, or as HTTP, but the later appears to have some bugs in displays data.
You can use similair technique to create new content (which will need form_build_id and form_token, and then whatever you want for title, body, etc.). When doing that, I found randomString function quite useful:
${__RandomString(700, abc defghijkl,;!.nmnopqrstuvwxyz0123456789 )}It created a 700 character string with any letter of the alphabet, any number, some punctuation, and space. And that is how you can use Jmeter to test for performance and scalability.
To learn more about testing, check out our blog post about automated testing with Selenium IDE.