A Developer's Guide For Contributing To Drupal
A Developer's Guide For Contributing To Drupal
Ryan Loos | Developer
February 19, 2020
One of Drupal’s defining features is its open source nature, and the fact that it invites contributions from its vast community. Having been in the Drupal world for a few years now, I found myself wanting to make my own contributions, but unclear on how best to do so.
The Drupal docs are sparse in some places, overly verbose in others, and they don’t take into account some of the specific tools we at Phase2 rely on, like Docker and Xdebug.
This guide is intended to help remove all of the barriers for getting patches up to Drupal.org.
Find an issue
If you’re following this guide with an issue already in mind, feel free to skip this section.
Otherwise, here are some steps to help you find an issue to solve:
- Project Work: Any bug, UI problem, error message, or other Drupal issue you run into while working on a project is a good opportunity to contribute
- Needs Testing: If you know your way around automated testing, then consider searching for the tag ‘needs tests’ in the issue queue. There are often dozens of patches languishing in limbo and waiting for a couple of tests so that they can be finally committed
- Composer Patches: In all likelihood your project has patches listed in its composer.json that either you, or one of your teammates decided was necessary. This is a perfect place to contribute because you’ll already have some context about what the issue is, which makes it easier to jump in and add whatever is necessary to finally get it committed (which could be as simple as a small test or some documentation)
- Comment history: Check the post history on your dashboard for issues that you’ve already engaged with. Maybe they could still use some help.
- Novice Tag: Some issues have been marked with the “novice” tag to indicate that they’re particularly good for people just getting started in the contrib space
Once you find an issue, consider following it by clicking the green star icon. That way you’ll receive notifications on comments.
Regardless of the approach you use to find an issue, keep in mind that it being either Core or Contrib will have a significant impact on your work. Core patches have a lot more visibility and the potential to help a lot more people, but since they’re core they’re going to have a lot more barriers to entry and will almost certainly require automated testing.
Contrib patches will likely have a smaller impact, but are usually easier to get in because they only need approval from the module’s developers. Once you’ve settled on an issue, you’re ready for the next step.
Dreditor
Before moving any further I would highly recommend you install Dreditor in your browser. This tool adds a number of tools to Drupal.org, the most important being the “review” button that it will add to patch links.
This button displays patch files in an easy-to-read format that makes full use of javascript and color-coding.
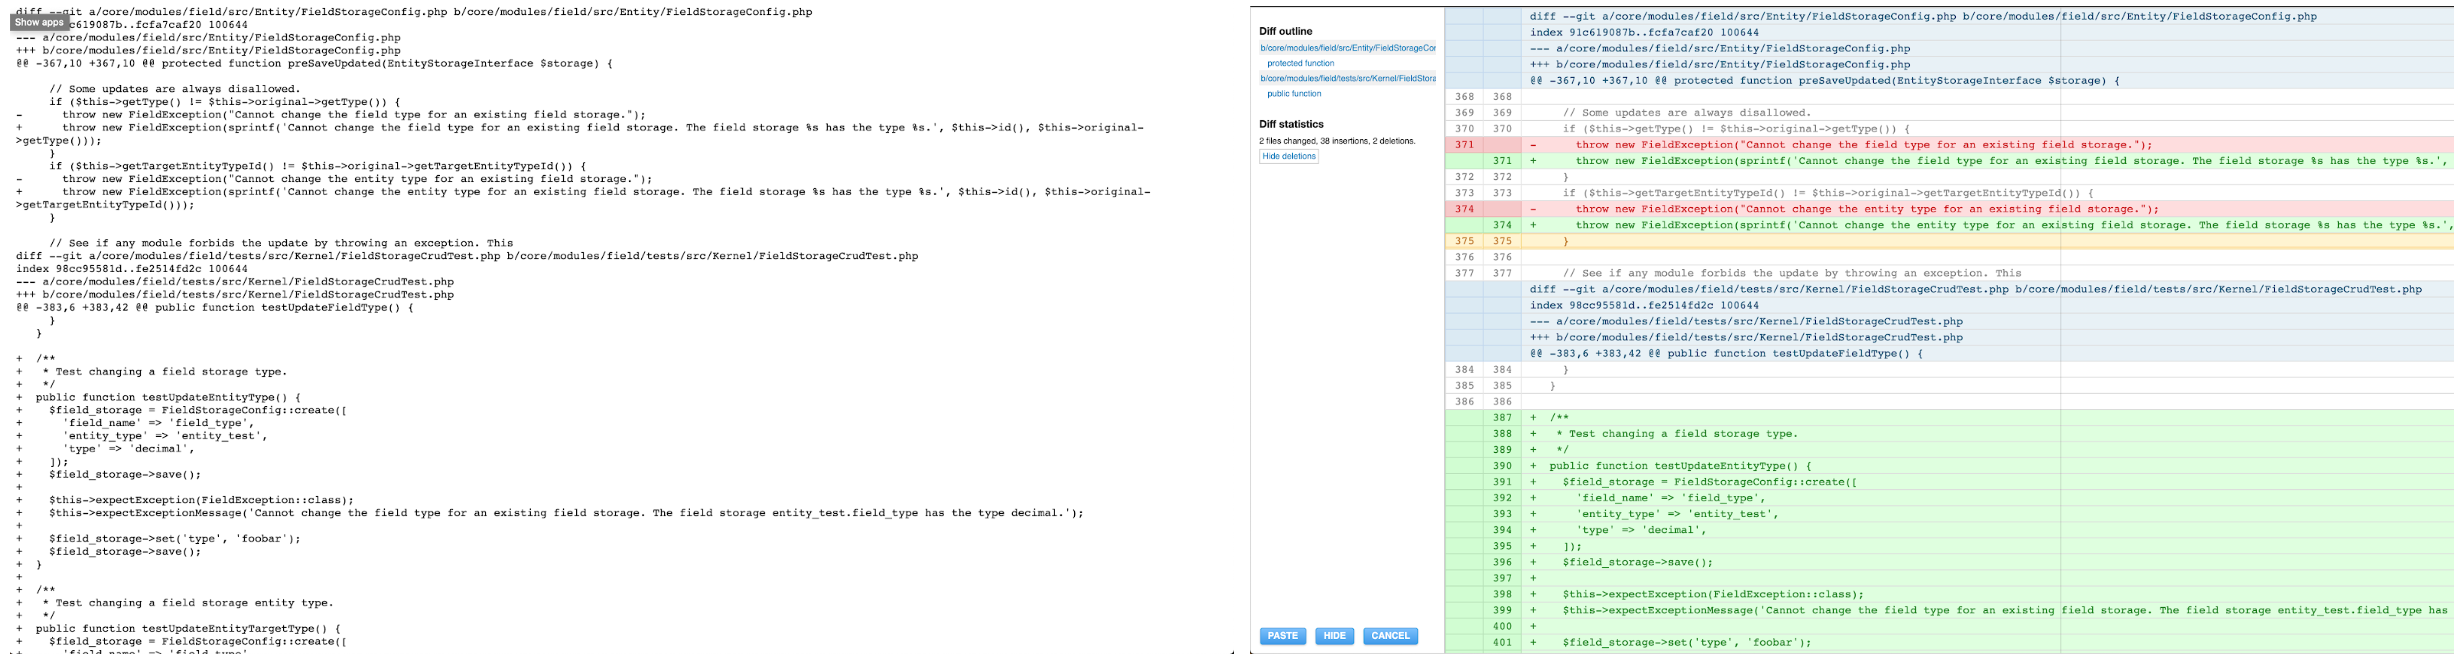
On the left is the default patch display, the right is the same patch appearing in Dreditor. Not only does this make patches from other contributors easier to understand, it also gives a nice UI for commenting on individual lines and code review.
Set up your environment
You should only have to do the set up steps once. If you already have your environment going feel free to skip this.
Docker
Like other projects, we should have a virtual environment to work in. At Phase2 we usually rely on Docker/Docksal for that task. Fortunately this repo makes it easy to set up a D8 environment using Docksal.
- Clone the repo:
git clone https://github.com/docksal/drupal8-contrib.git- Get to the root:
cd drupal8-contrib- Initialize the site:
fin init- Open it in browser (after init is done): http://drupal8-contrib.docksal
- Log in using the password and username output at the end of
fin init
Xdebug
Xdebug is a crucial tool for debugging PHP code, but it can be a challenge to set up. Use the following steps to get it running on your Drupal8 local site.
- Go into Preferences > Languages and Frameworks > PHP > Debug and make sure your settings match the following screenshot.

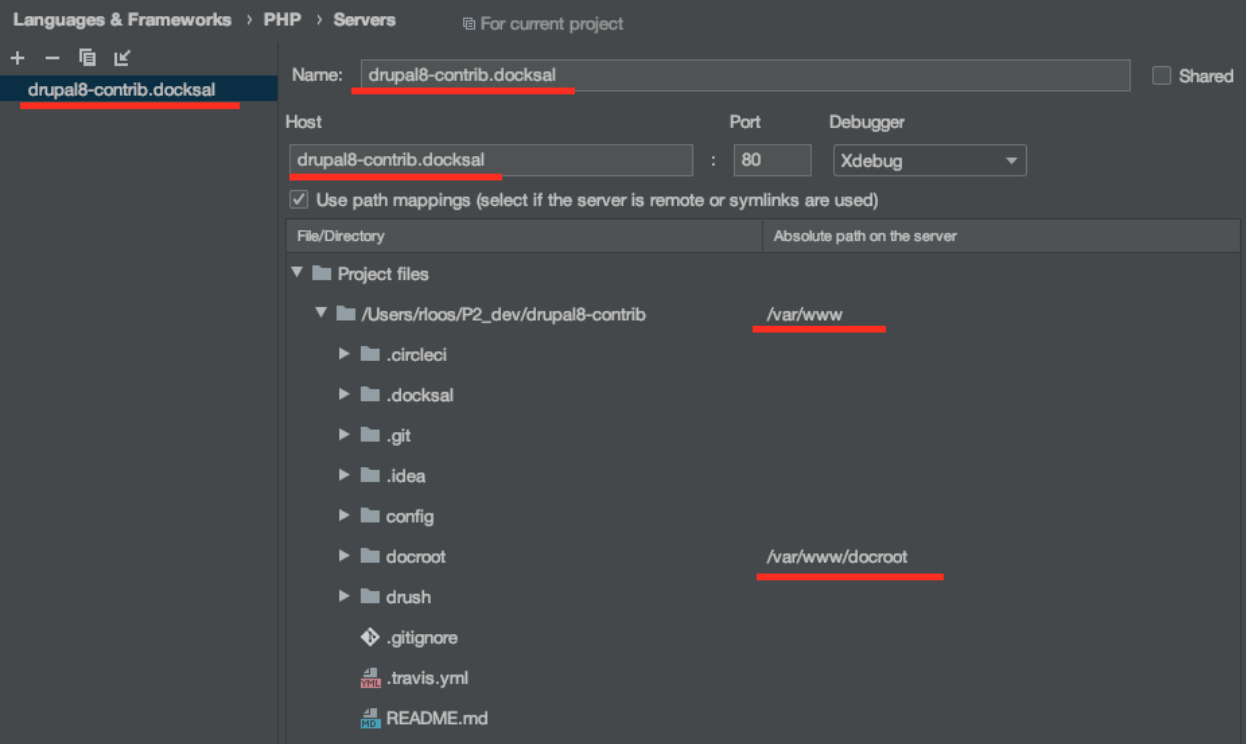
2. Preferences > Languages and Frameworks > PHP > Servers and make sure your settings match the following screenshot.
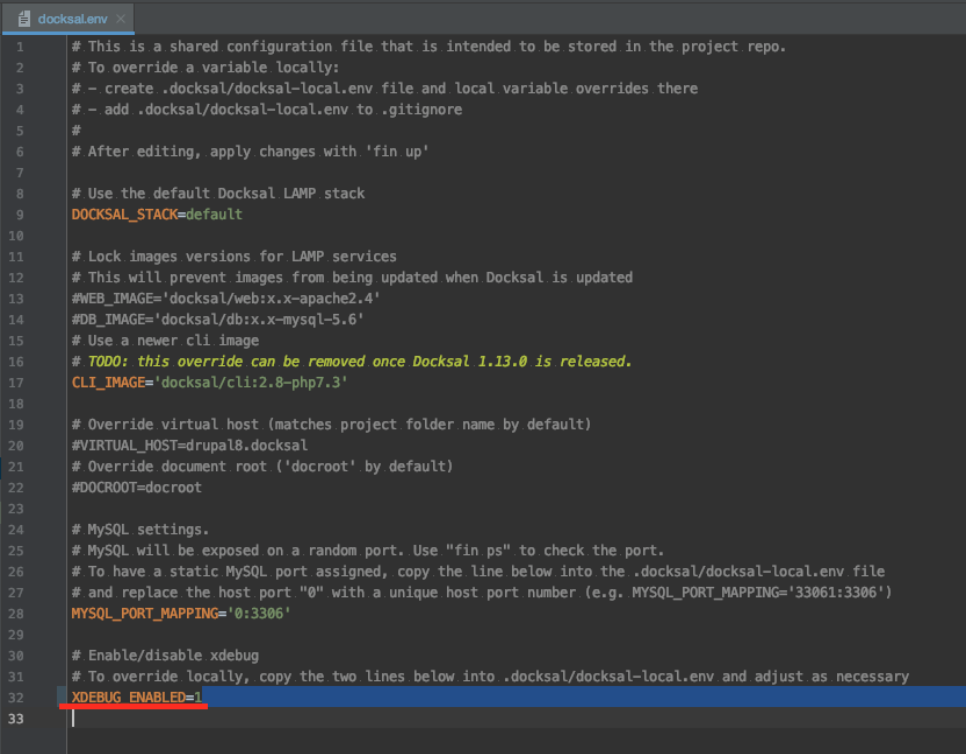
3. Go to your docksal.env file and change the value of XDEBUG_ENABLED to 1.
4. Restart your containers with fin restart to make sure your change to the environment takes effect.
5. If Xdebug still isn’t working, try the following steps:
- Make sure Xdebug is not muted
- Make sure your listener (the phone icon in PHPStorm) is enabled
- Put a breakpoint in index.php, and if Xdebug fires successfully then your code isn’t doing what you think it is
- Check the docs https://docs.docksal.io/tools/xdebug/
Be aware that Xdebug, while helpful, can also slow down your system a lot, so you don’t always want to have it enabled. Here are two ways to address that issue:
- Make a Bash alias to toggle xdebug and restart containers
fin config set XDEBUG_ENABLED=1 && fin restart - Use the existing fin
php/xdebugon and finphp/xdebug offcommands to toggle xdebug. This shortcut runs faster and doesn’t require restarting containers, but the site will still have some slowdown compared to the previous method.
Git setup
Follow these steps to get Git set up.
- Are you patching Core or a module?
- Core
cd docrootgit checkout -b 12345-short-description\
- Module
cd modulesgit clone git@git.drupal.org:project/machine_namecd module_name`git checkout -b 12345-short-description
- Core
- 12345 is the issue number, and short-description is just something to remind you of the issue.
- Are you working on top of an existing patch?
- Make sure you’re in the project’s root directory
- Download the patch file
curl -O https://www.drupal.org/files/[patch-name].patch - Apply the patch
git apply [patch-name].patch - Confirm the changes by running
git diff
Code your fix
Now you’re finally able to write the code that will address your issue, and there are a few things to keep in mind while doing so.
Testing
First, make sure whatever you add is reinforced by automated tests, either by updating existing tests or making your own. You can run tests using the following commands:
Test an entire file: fin phpunit path/to/file
Run an individual tfin init est: fin phpunit path/to/file --filter=testFunctionName
You also probably want to turn off Xdebug before running tests as it will make them take much longer.
Functional tests are particularly guilty of this problem and as such can be hard to create. However, if you pass the --printer="\Drupal\Tests\Listeners\HtmlOutputPrinter" tag into your test, your terminal will print out something like the following.
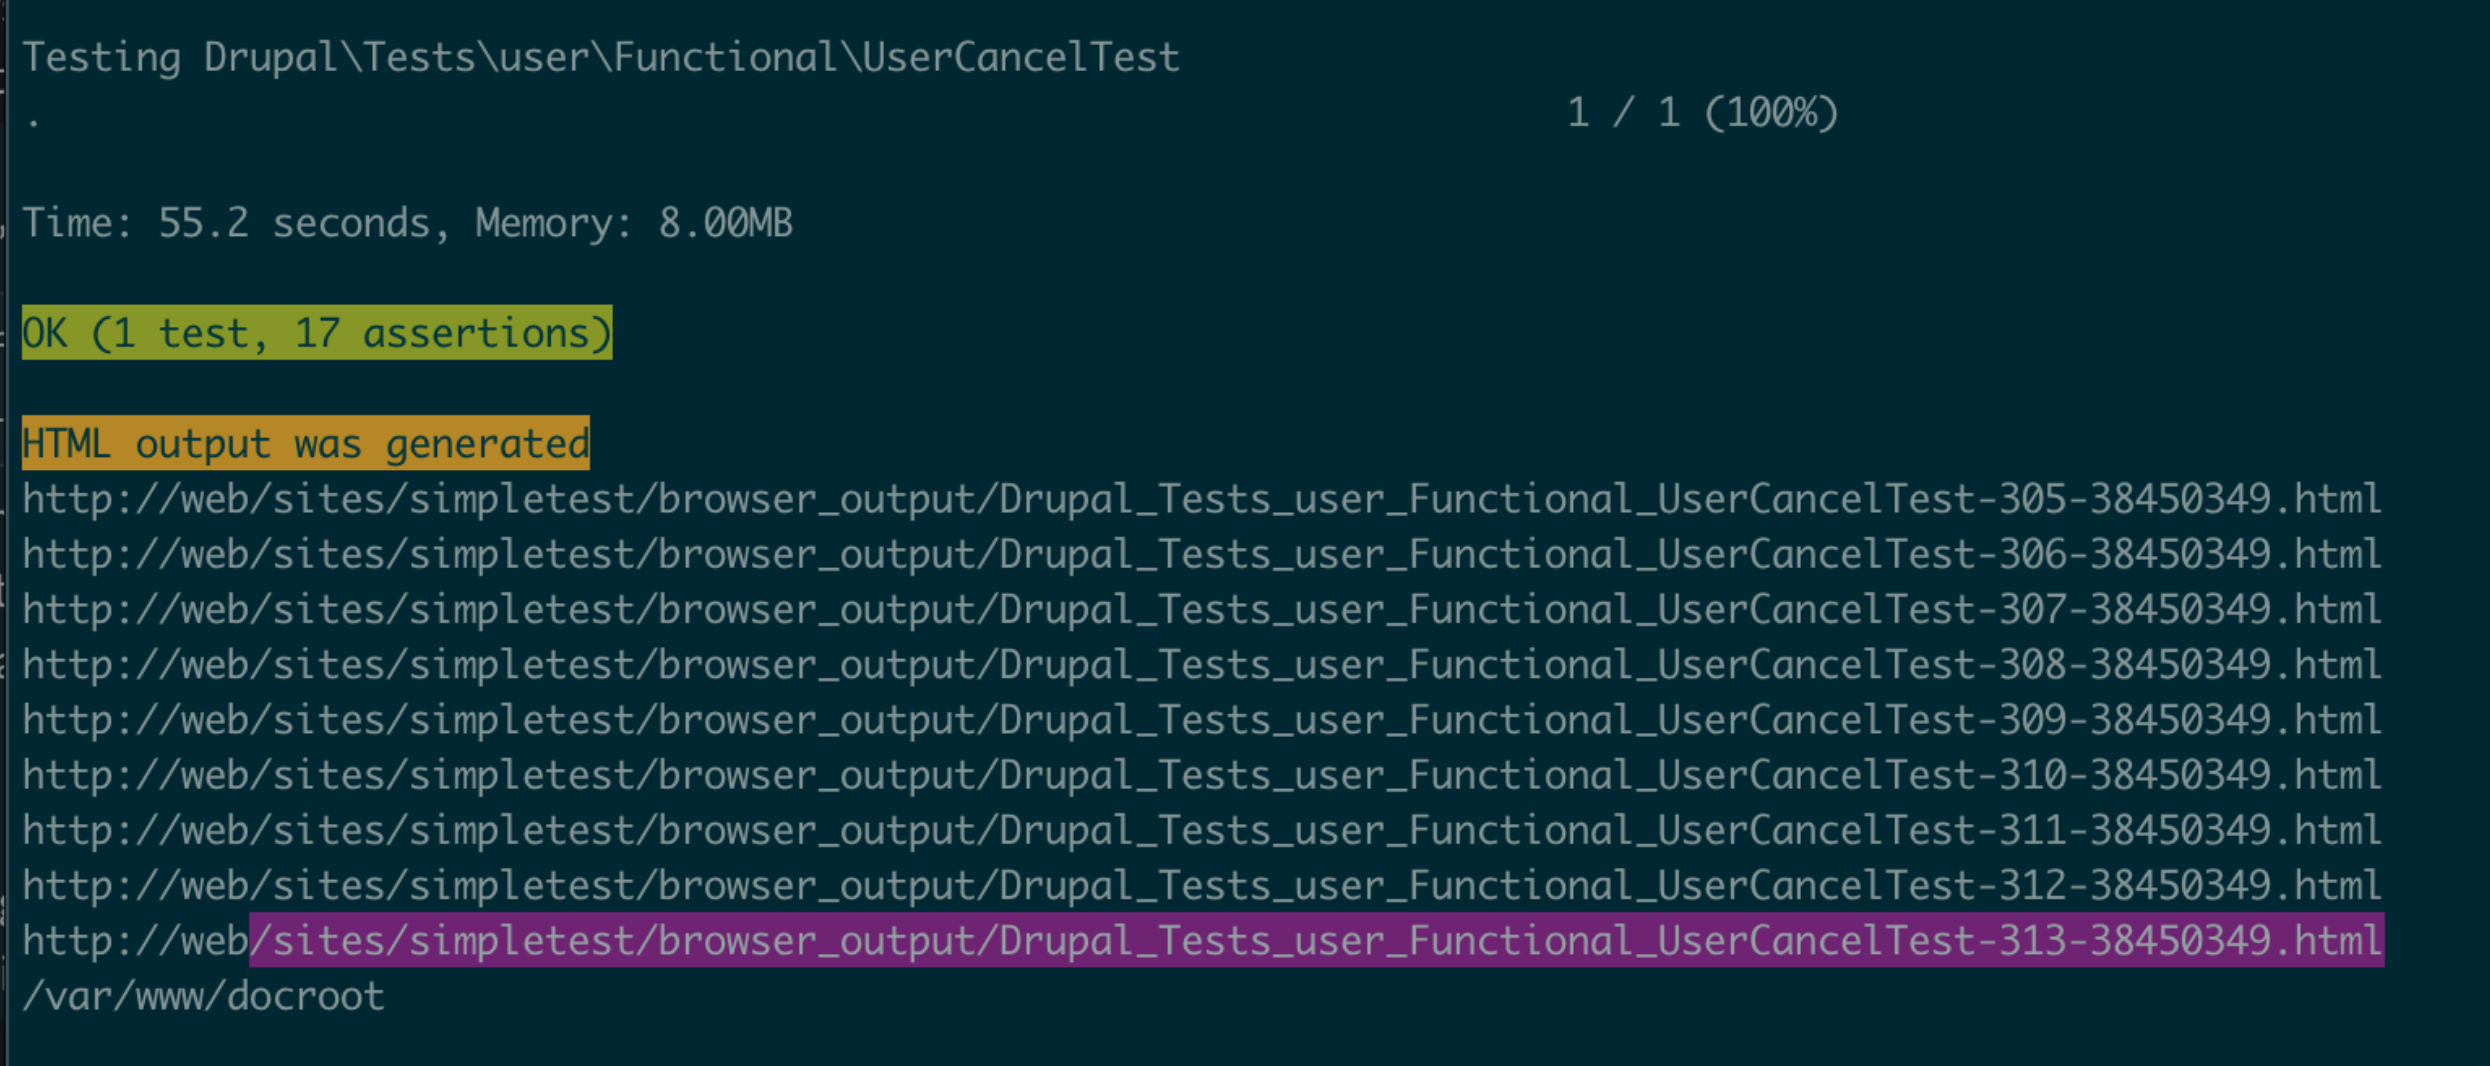
Each url represents a different step in running the functional test, such as logging in or creating a user. Assuming this test was using the aforementioned docksal setup, you could see the generated html by going to: fin http://drupal8-contrib.docksal/sites/simpletest/browser_output/Drupal_Tests_user_Functional_UserCancelTest-313-38450349.html
Writing good tests will likely save you time in the long run, not only by catching regressions, but also because tested code is far more likely to be merged in.
Commit Strategy
Feel free to follow whatever commit strategy makes sense to you, since the patch file you’ll be creating won’t have an associated git history. That being said, it’s recommended that if you’re working on top of multiple patches that you make a commit between each patch to make jumping between them easier.
Finalizing
Once you’re confident about your work, make sure to add comments where appropriate and run php codesniffer to ensure that your code is up to Drupal 8 standards:fin composer phpcs path/to/file
E.g. fin composer phpcs core/modules/field/tests/src/Kernel/FieldStorageCrudTest.php
Once your code is complete, it's time to generate a patch file. Depending on how long you’ve been working on the patch, you’ll probably want to pull down the most recent version of the Drupal master branch and rebase your new branch off of it to make sure that your patch file only contains your changes. The following command will generate your patch file.git diff master_branchname > [patch_name.patch]
E.g git diff 8.8.x> my_patch.patch
Finally, if you’re adding to an existing patch its best practice to generate an interdiff file to post with your patch. An interdiff is a text file in patch format that makes it easier for reviewers to understand the changes between patches. git diff HEAD~1 > ISSUE_ID-COMMENT_ID-interdiff.txt
Shortcuts
It should be clear by now that this process requires a lot of detailed and error-prone steps, fortunately there are a number of shortcuts and tools that can make this process easier.
Gitconfig
You can put a number of incredibly useful shortcuts into your local gitconfig file. For example, the following lets you download and apply a patch very easily:
a = apply --index
ac = "!f() { curl $@ | git a; }; f"
E.G. git ac https://www.drupal.org/files/issues/2019-04-23/core-field-storage-error-message-3050264-1.patch
This code lets you easily download contrib modules from Drupal.org:
[url "git@git.drupal.org:project/"]
 insteadOf = dm:
E.G. (from the modules directory) git clone dm:token
With a little Bash knowledge you can put all kinds of useful shortcuts in the gitconfig file.
Drupal CLI
I also highly recommend installing the Drupal CLI tool which you can find here. There are a host of useful things in this CLI, and here are some of the highlights.
- List test results for an issue
drupalorg drupalci:list [issue_number] - Apply the latest patch from the issue
drupalorg issue:apply [issue_number] - Generate a patch for the issue from committed local changes
drupalorg issue:patch [issue_number] - Create a branch for the issue
drupalorg issue:branch [issue_number]
Dorgflow also has some helpful command line tools, for instance after all your work is finished you can type dorgflow and it will create a patch and an interdiff file for you.
Make sure you fully understand the process that is being run before using these shortcuts. While they’re helpful, they can break, and you do not want to be fully dependent on them.
Post your patch
Once you’re done with your patch and interdiff, post it to the issue with a comment about what you changed and set its status to ‘needs review,’ this will run all tests and tell other developers that your work is ready for feedback. If your patch isn’t getting a lot of attention, feel free to reach out to people on the official Drupal Slack Channel and ask for reviews. Also, keep in mind that while writing your own patches is great, contribution also involves commenting on and reviewing other people’s work. In general, the more you review, the more likely you are to get your work reviewed.